In *Tower Blitz*, you begin with a single tower type, but as you progress, you'll unlock an array of towers, each with unique strengths and weaknesses. To help you craft the best strategy for your play style, we've compiled a comprehensive tier list of all the towers in *Tower Blitz*.
All Towers In Tower Blitz Ranked
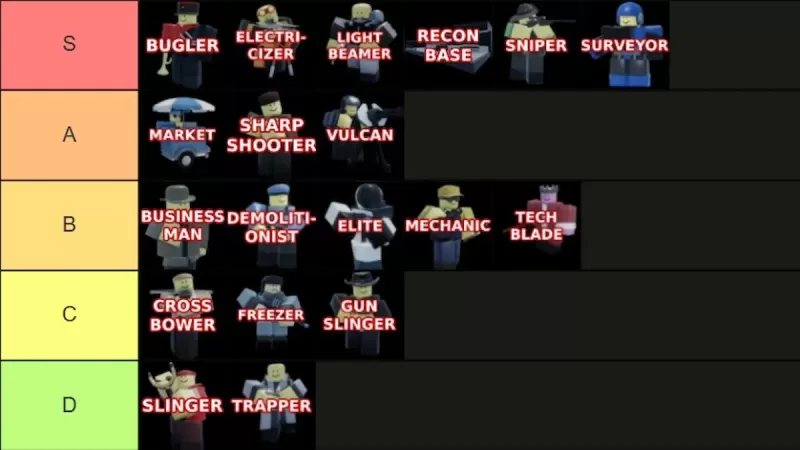 Image by The Escapist. We've ranked all the towers from S-Tier to D-Tier, considering their abilities, upgrade paths, cost, and overall efficiency. **S-Tier** towers are the cream of the crop, nearly guaranteeing victory on any map when used effectively. **A-Tier** towers are solid but have some drawbacks that keep them from the top spot. **B-Tier** towers are middle-of-the-road, neither exceptional nor terrible. **C-Tier** towers have significant flaws, though they may offer some niche benefits. **D-Tier** towers are the least effective and should be avoided where possible. Below, we'll delve into why each tower is placed in its respective tier.
S-Tier Towers
| Tower | Cost | Explanation | Pros and Cons |
|---|---|---|---|
 | Unlock: **2500 Tokens** (Level 25) Placement: **750 Cash** | A powerhouse of a support tower, essential for Expert mode. Its versatility in boosting other towers is unparalleled, though it can't buff Recon Bases. | + Significantly boosts other towers + Essential for Expert mode – Purely a support tower |
 | Unlock: **5500 Tokens** Placement: **3800 Cash** | Ideal for players seeking a more powerful alternative to the Sniper. With the largest range and damage in the game, it's perfect for late-game placement at the end of the map. | + Exceptional power and range + Dual support and damage capabilities – High cost |
 | Unlock: **Complete the contract** Placement: **1800 Cash** | A formidable tower with a devastating death ray, perfect for straight paths. Both upgrade paths are highly effective, making it a game-changer if placed correctly. | + Extremely powerful + Excellent crowd control – Not viable early-game – Expensive |
 | Unlock: **8000 Tokens** (Level 45) Placement: **1000 Cash** | A cost-effective powerhouse that spawns operatives to fight alongside you. Both upgrade paths are strong, making it a crucial asset for Expert mode, despite its high upgrade costs. | + Continuously spawns units + Both paths are overpowered + Perfect for Expert mode – Expensive upgrades |
 | Unlock: **1500 Tokens** Placement: **500 Cash** | The go-to early-game tower, its versatility extends into mid and late-game, especially in Expert mode. While some may find it slow, the bottom path can mitigate this. | + Top early-game tower + Usable throughout the game + High piercing damage – Slightly slow |
 | Unlock: **Complete the contract** Placement: **700 Cash** | A versatile tower that can be tailored as either support or damage-focused. With the right setup, it can be a game-changer from start to finish. | + Highly versatile + Usable from start to finish – Limited to four placements |
A-Tier Towers
| Tower | Cost | Explanation | Pros and Cons |
|---|---|---|---|
 | Unlock: **1000 Tokens** Placement: **650 Cash** | A valuable tower for generating income, especially in multiplayer. Focus on the top path for steady cash flow, as the bottom path can lead to losses. | + Crucial for income in all games + Profitable – Bottom path can be risky – Slow initial earnings |
 | Unlock: **1300 Tokens** Placement: **600 Cash** | An excellent early-game tower for crowd control. Its large range covers early threats, though its piercing damage is moderate. | + Great for crowd control and damage + Ideal for beginners – Less effective in Expert – Low defense piercing |
 | Unlock: **3000 Tokens** Placement: **2500 Cash** | A strong choice for mid to late-game. Opt for the bottom path for maximum strength, which offers significant DPS and full defense piercing. | + Highly effective + Versatile – Slow to reach full potential – No flying detection |
B-Tier Towers
| Tower | Cost | Explanation | Pros and Cons |
|---|---|---|---|
 | Unlock: **Complete the contract** Placement: **800 Cash** | A dual-purpose tower that generates income and deals damage. While useful early on, it's outshined by more specialized towers. | + Generates income and deals damage + Useful early-game – Easily replaceable |
 | Unlock: **3500 Tokens** Placement: **900 Cash** | Effective early-game for crowd control and piercing damage, but quickly becomes obsolete as better options emerge. No flying detection is a significant drawback. | + Good early-game crowd control – Limited use after early-game – No flying detection |
 | Unlock: **Complete the contract** Placement: **1200 Cash** | Similar to Vulcan but less versatile. The bottom path is the way to go, though its long cooldown is a notable limitation. | + Strong bottom path – Long cooldown – High cost |
 | Unlock: **Complete the contract** Placement: **480 Cash** | Useful in mid-game due to its variety of turrets, though only the Tesla turrets are impactful. Its high cost can be a deterrent. | + Effective in mid-game – Cost-inefficient |
 | Unlock: **Free** (Level 10) Placement: **400 Cash** | A melee tower effective against early-game crowds and tanks. Its limited range and slow speed hinder its overall utility. | + Good for crowd control + Effective early-game – Limited range – Slow |
C-Tier Towers
| Tower | Cost | Explanation | Pros and Cons |
|---|---|---|---|
 | Unlock: **200 Tokens** Placement: **400 Cash** | A decent choice for beginners or as an early-game alternative. Its long range is a plus, but its low damage limits its utility. | + Affordable, good for beginners + Long range – Limited to early-game – Low damage |
 | Unlock: **450 Tokens** Placement: **400 Cash** | Useful when paired with high DPS towers, particularly against fast enemies. However, its effectiveness wanes as enemies gain freeze immunity. | + Effective against fast enemies – Limited use after early-game – Only works on specific enemies |
 | Unlock: **500 Tokens** Placement: **400 Cash** | A melee tower with poor range and damage, making it unsuitable for higher difficulties. The top path can improve range but at the cost of damage. | + Decent top path – Limited range – Not viable in Hard or Expert |
D-Tier Towers
| Tower | Cost | Explanation | Pros and Cons |
|---|---|---|---|
 | Unlock: **Free** Placement: **200 Cash** | Primarily a tutorial tower, useful only for the first few waves. Its low damage and slow firing rate make it quickly obsolete. | + Free – Poor damage and speed – Limited to early waves |
 | Unlock: **1000 Tokens** (Level 10) Placement: **500 Cash** | Despite its cost, it struggles against even weak enemies, making it a poor choice compared to other, more effective towers. | + Decent bottom path – Not cost-effective – Often ineffective – Struggles throughout the game |
With this tier list, you're equipped to tailor your strategy to your preferred play style in *Tower Blitz*. For an extra boost, don't forget to use our *Tower Blitz* codes to get ahead in the game.


