Quick Links
For anyone diving into Path of Exile 2's challenging endgame, setting up a suitable loot filter is essential. Not only do these filters clear up on-screen clutter to make your mapping sessions more enjoyable, but they also enhance your gameplay by highlighting only the most relevant items, saving you the hassle of sifting through irrelevant drops.
FilterBlade, renowned for its effectiveness in Path of Exile 1, has now been updated to support PoE 2 as well. Here's a step-by-step guide on how to leverage its capabilities.
How to Set Up FilterBlade Loot Filters in Path of Exile 2
- Begin by visiting the FilterBlade website.
- Choose PoE 2 from the available options.
- The default NeverSink loot filter will be selected automatically.
- Adjust the Strictness level using the provided slider (more details on this later).
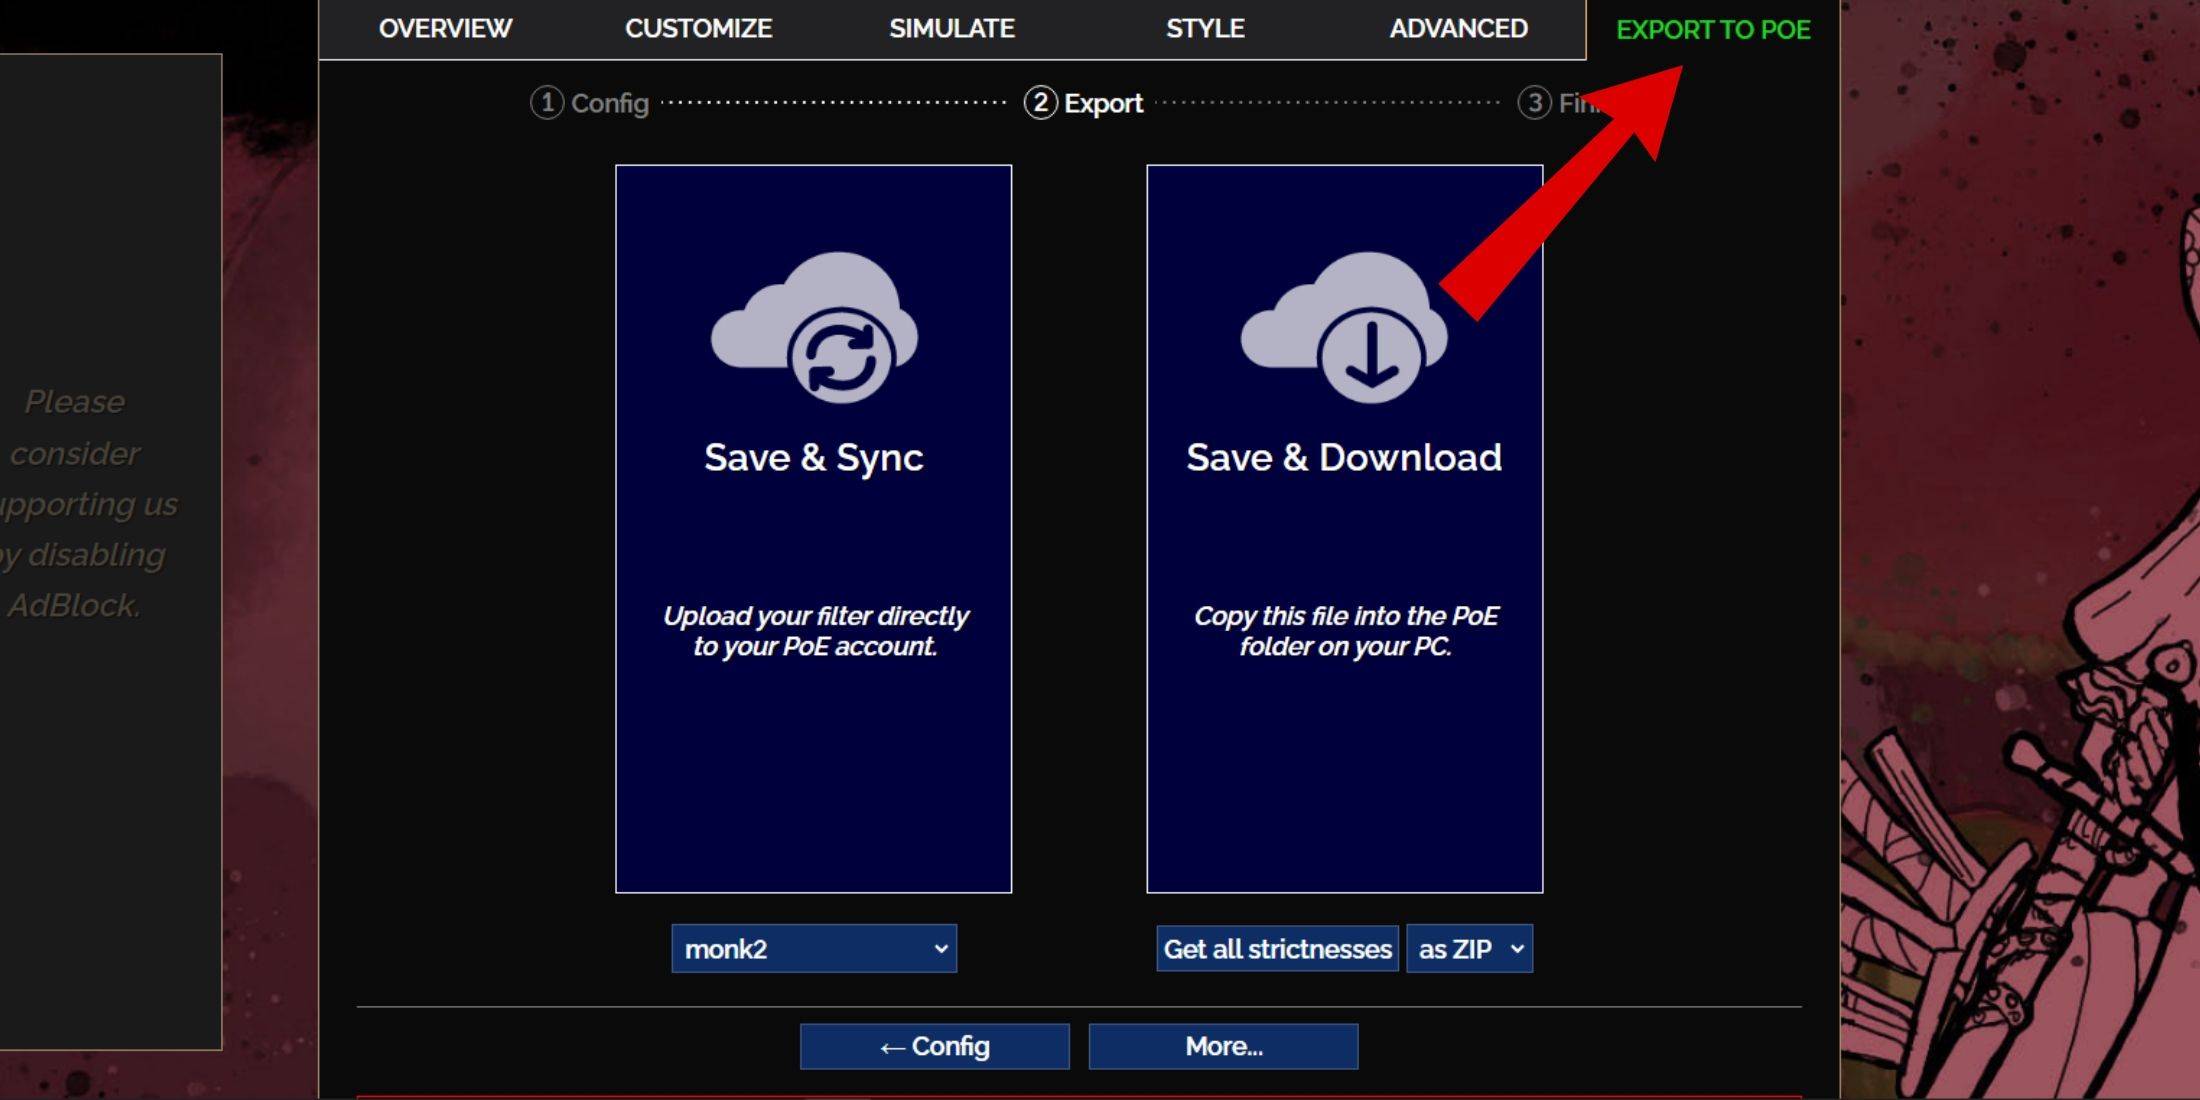
- Navigate to the 'Export to PoE' tab located at the top right.
- Name your filter as desired.
- Decide between 'Sync' or 'Download' at the bottom right:
- Save & Sync will integrate the FilterBlade loot filter directly into your PoE 2 account, ensuring automatic updates as the filter's author makes changes.
- Save & Download allows you to save the file on your computer, useful for comparing different Strictness levels without multiple syncs or at the start of a new campaign.
- Launch PoE 2 and access the Options menu, then go to Game settings.
- If you chose Sync, select your newly synced FilterBlade from the Item Filter dropdown.
- If you opted for Download, use the folder icon next to the dropdown to locate and select your downloaded filter.
Congratulations! Your FilterBlade loot filter is now active in PoE 2.
Which Loot Filter Strictness Should You Choose?
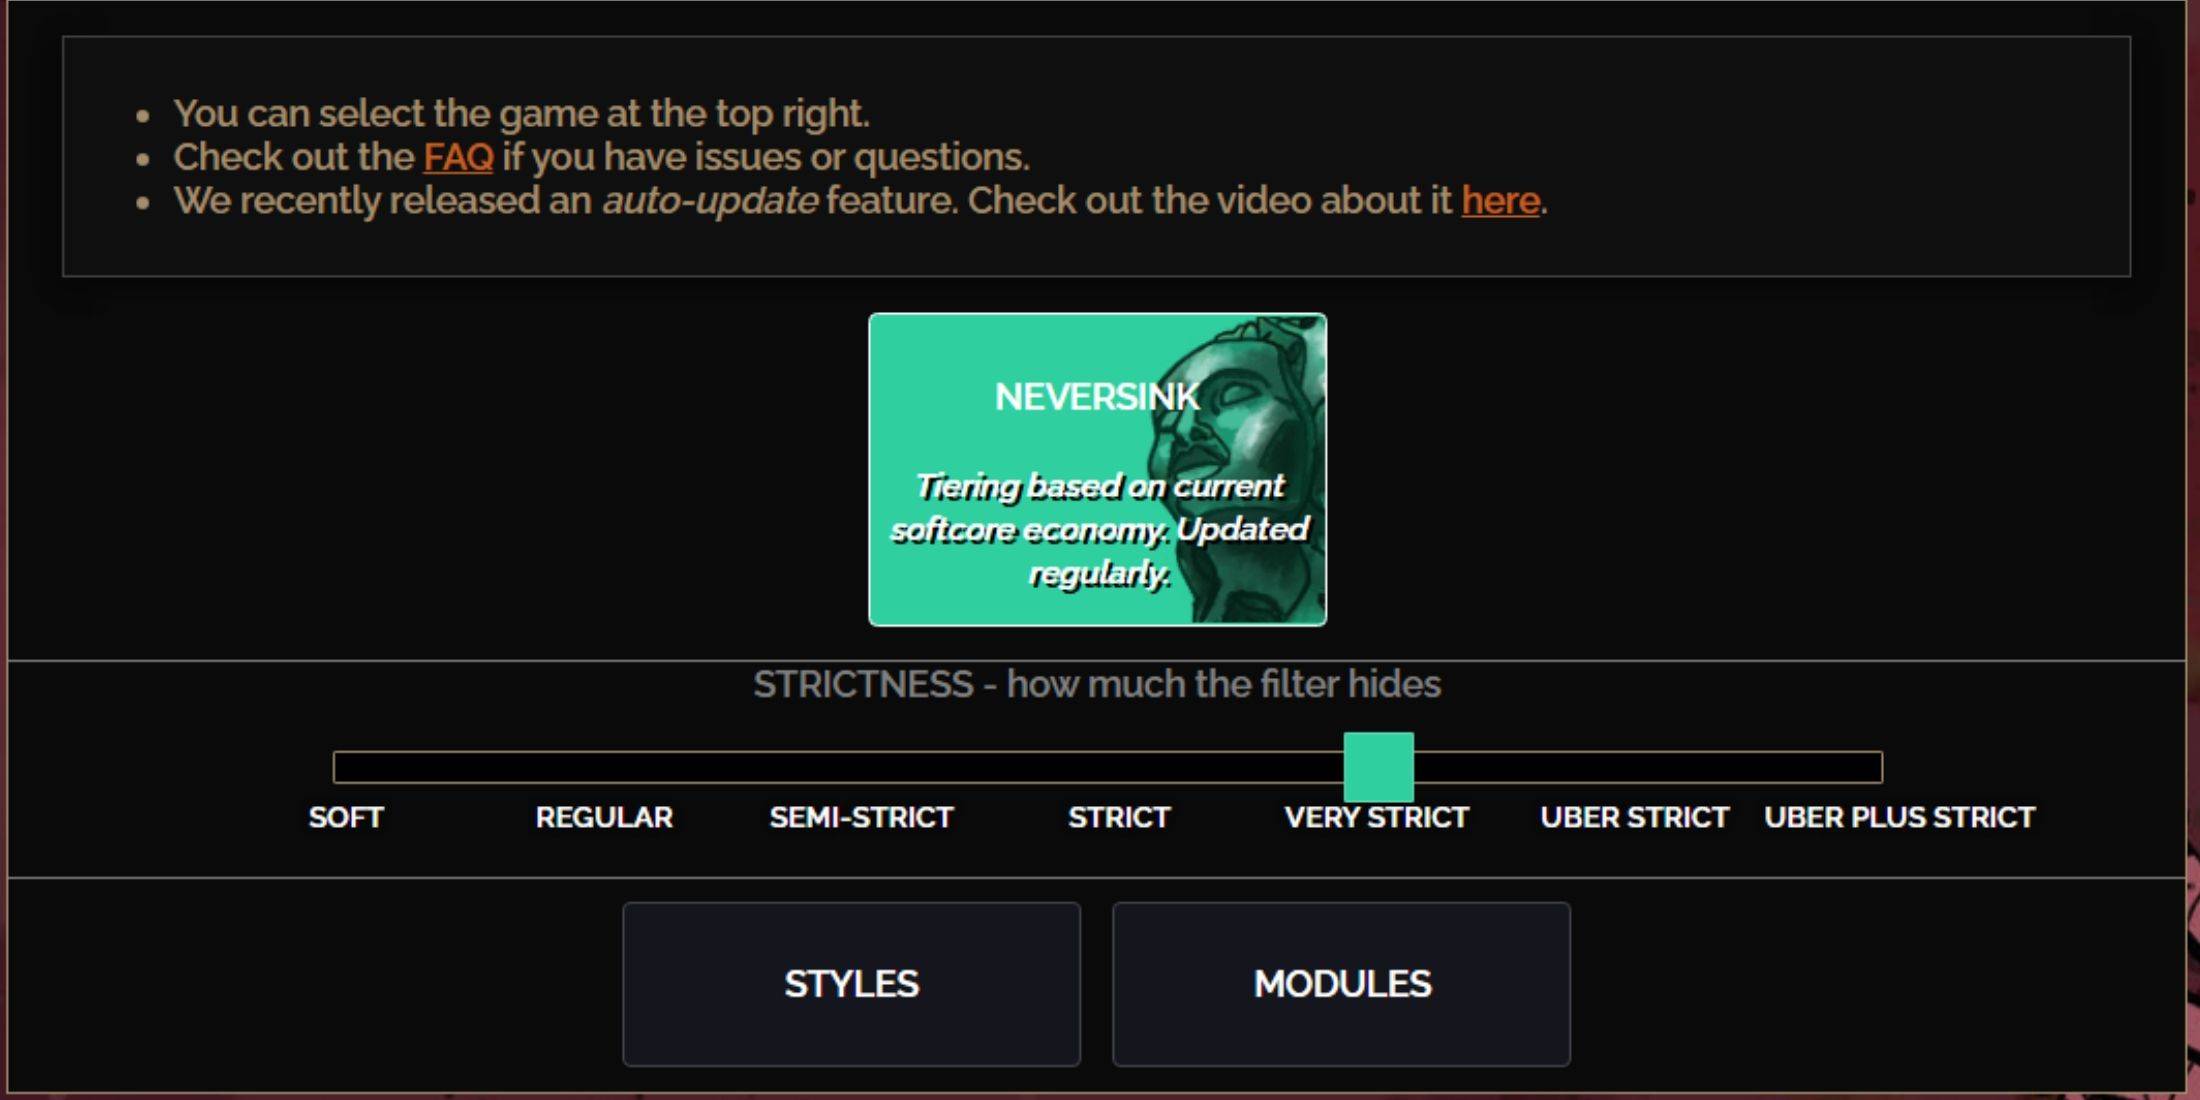
The NeverSink FilterBlade preset offers seven strictness levels, each tailored to different stages of your journey through PoE 2. Choosing the right level from the start is crucial as it influences what items you'll see in-game. You can always fine-tune with exceptions, but starting with the right strictness prevents future headaches.
| Strictness | Effect | Best For |
|---|---|---|
| Soft | Highlights valuable materials and items, nothing is hidden. | Act 1-2 |
| Regular | Hides only items with no crafting potential or sale value. | Act 3 |
| Semi-Strict | Hides items with low potential or limited value. | Act 4-6 |
| Strict | Hides most items without high turnover. | Early Mapping (Waystone Tier 1-6) |
| Very Strict | Hides low-value rare items, crafting bases, and Waystone Tier 1-6. | Mid to Late Mapping (Waystone Tier 7+) |
| Uber Strict | Hides almost all non-tiered rare items, crafting bases, and Waystones Tier 1-13. Focuses on complete currency. | Late Mapping (Waystone Tier 14+) |
| Uber Plus Strict | Hides everything except valuable currencies and high return rares/uniques. Also hides Waystones Tiers 1-14. | Ultra Endgame Mapping (Waystone Tier 15-18) |
For players embarking on a second or third campaign run, starting with a Semi-Strict level is advisable. For new, fresh league starts where every item is crucial for progression, especially in Solo Self-Found (SSF) scenarios, opt for Soft or Regular Strictness levels.
Remember, you can always use the highlight key (ALT on PC) to view items hidden by your filter temporarily. FilterBlade cleverly reduces the size of these items' names to nearly invisible when highlighted, ensuring a clean map view.
How to Customize FilterBlade Loot Filter in PoE 2
FilterBlade's strength lies in its user-friendly customization options, allowing you to tweak your loot filter without diving into complex code.
How to Use the Customize Tab in FilterBlade
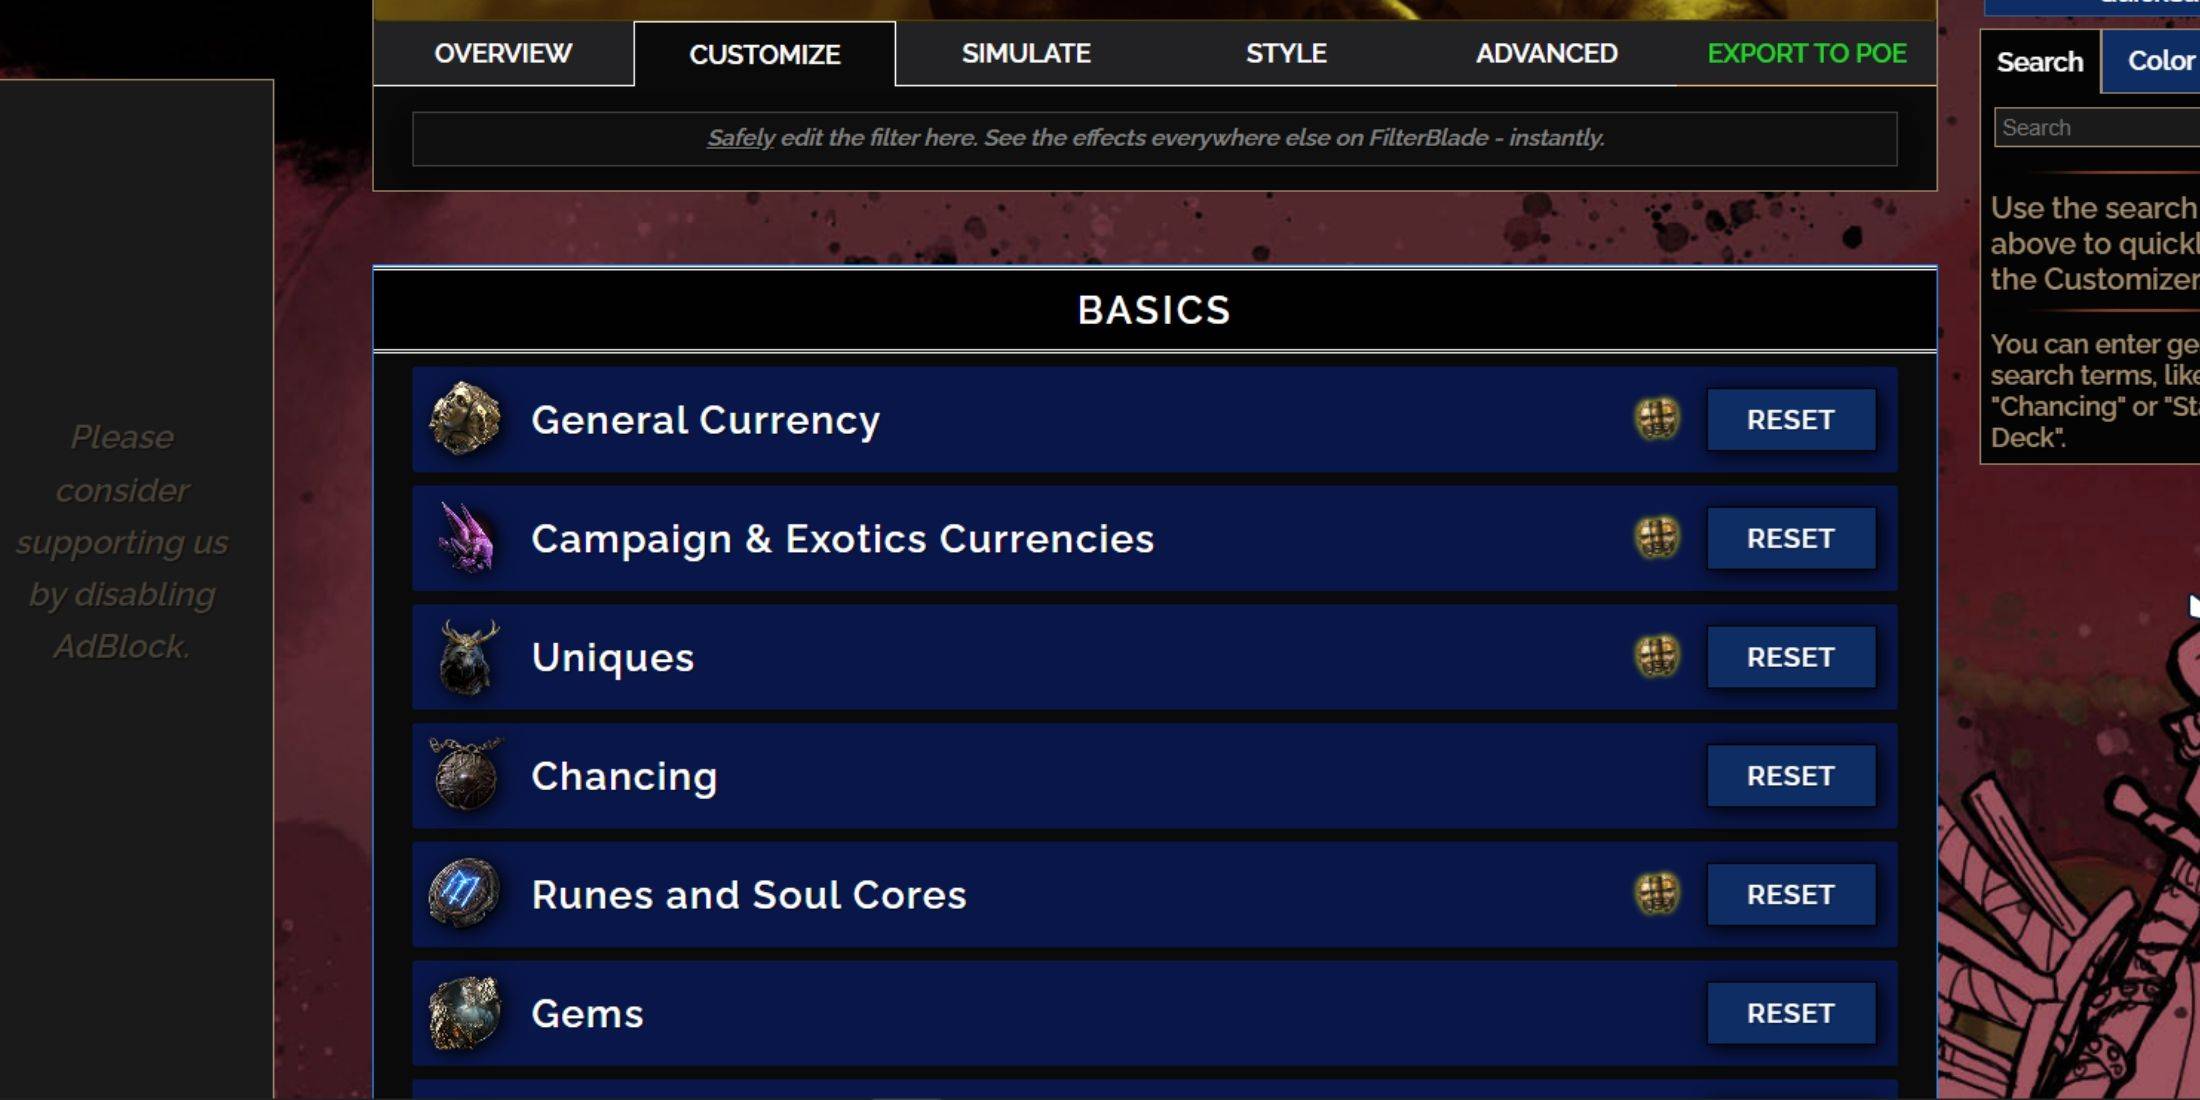
For detailed customization, head to the 'Customize' tab next to Overview. Here, you'll find a comprehensive list of every possible drop in PoE 2, categorized and subcategorized for ease of navigation.
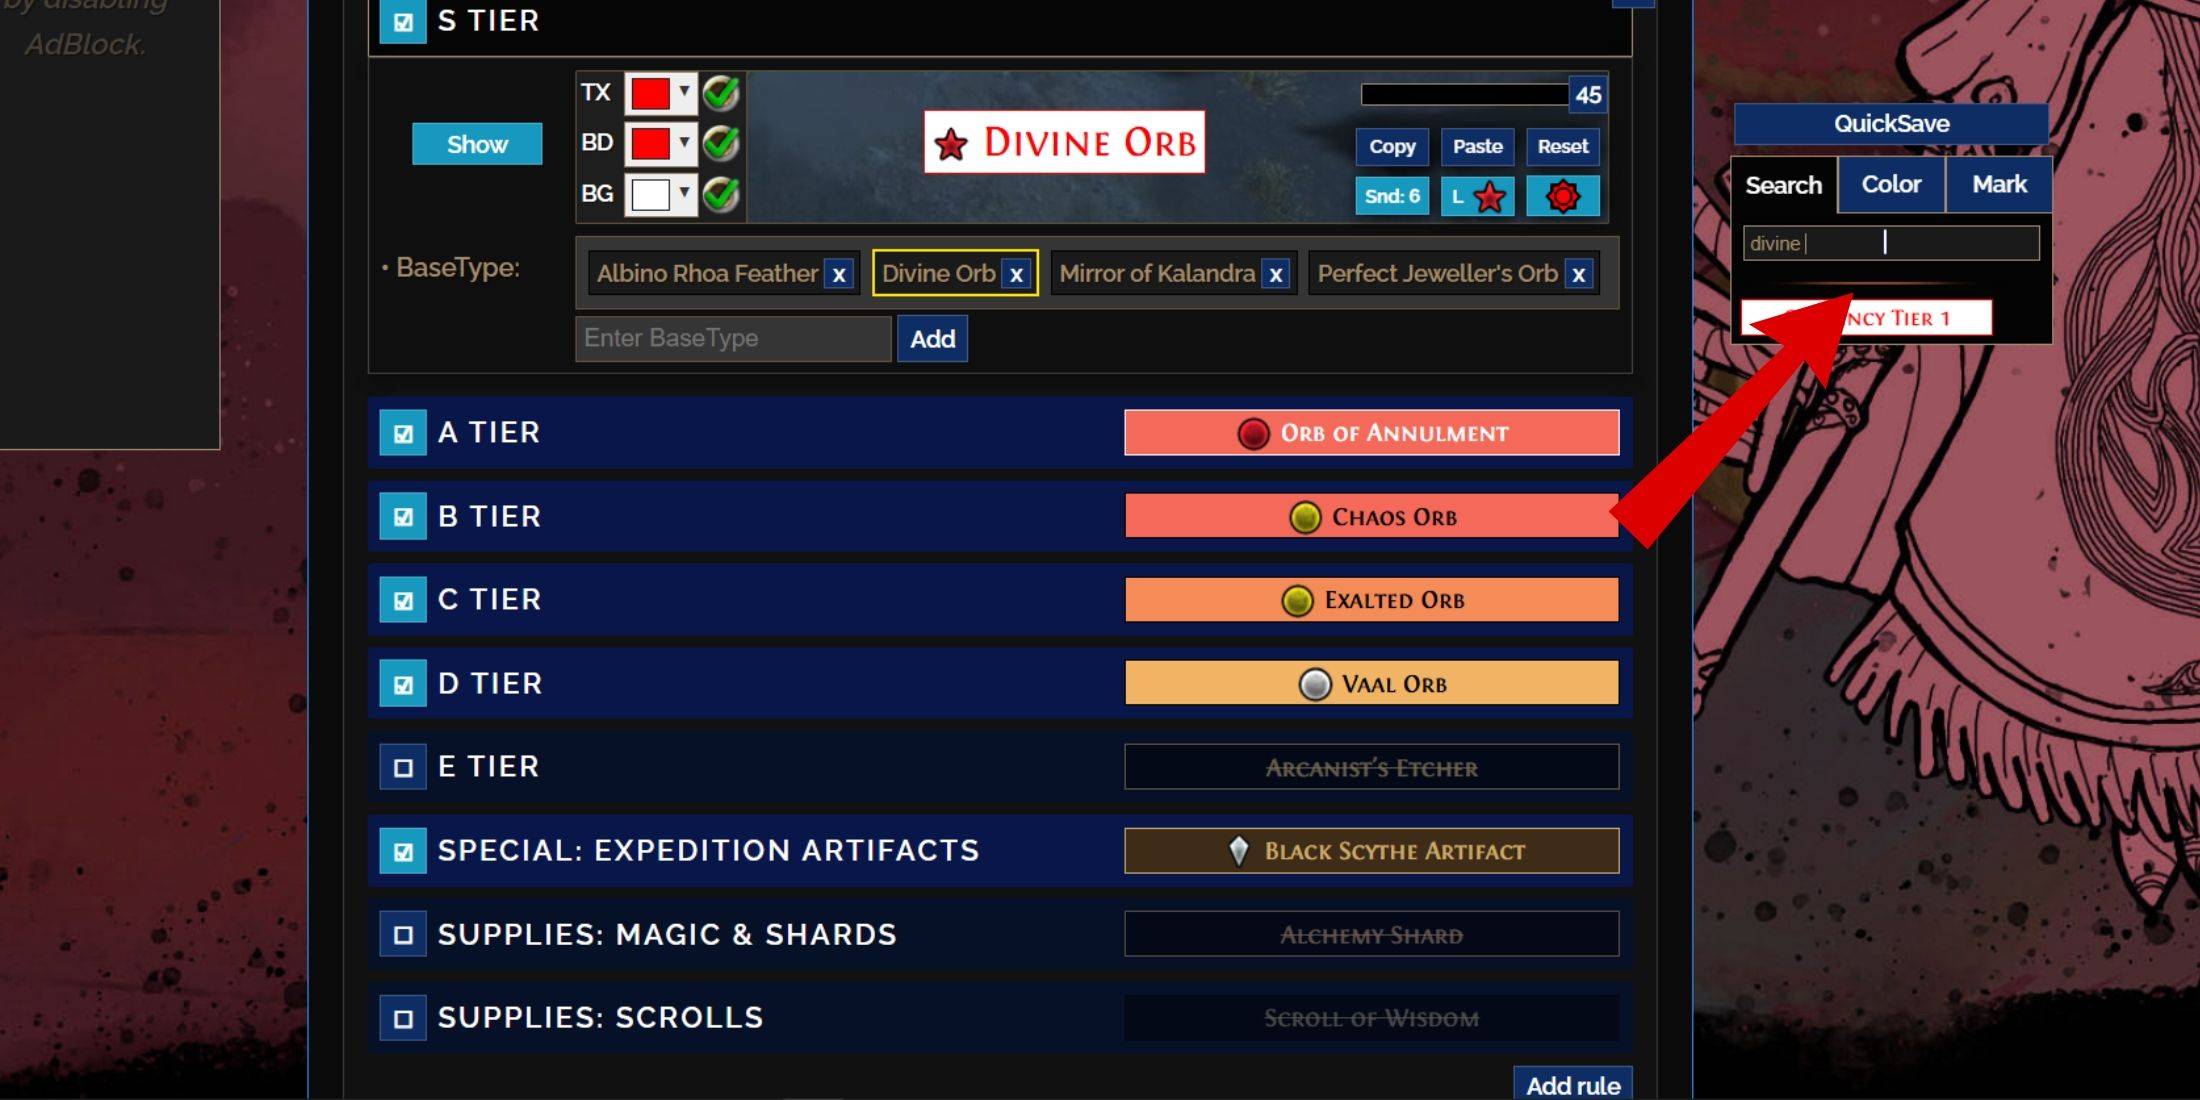
For instance, if you wish to modify the appearance of a Divine Orb when it drops, simply enter "Divine Orb" into the search bar on the right. This will direct you to the S Tier General Currency tab, where you can adjust various aspects of the Divine Orb's visual representation, with immediate previews available.
To preview the sound of an item dropping, click on the in-game showcase icon.
How to Change Colors and Sounds in FilterBlade
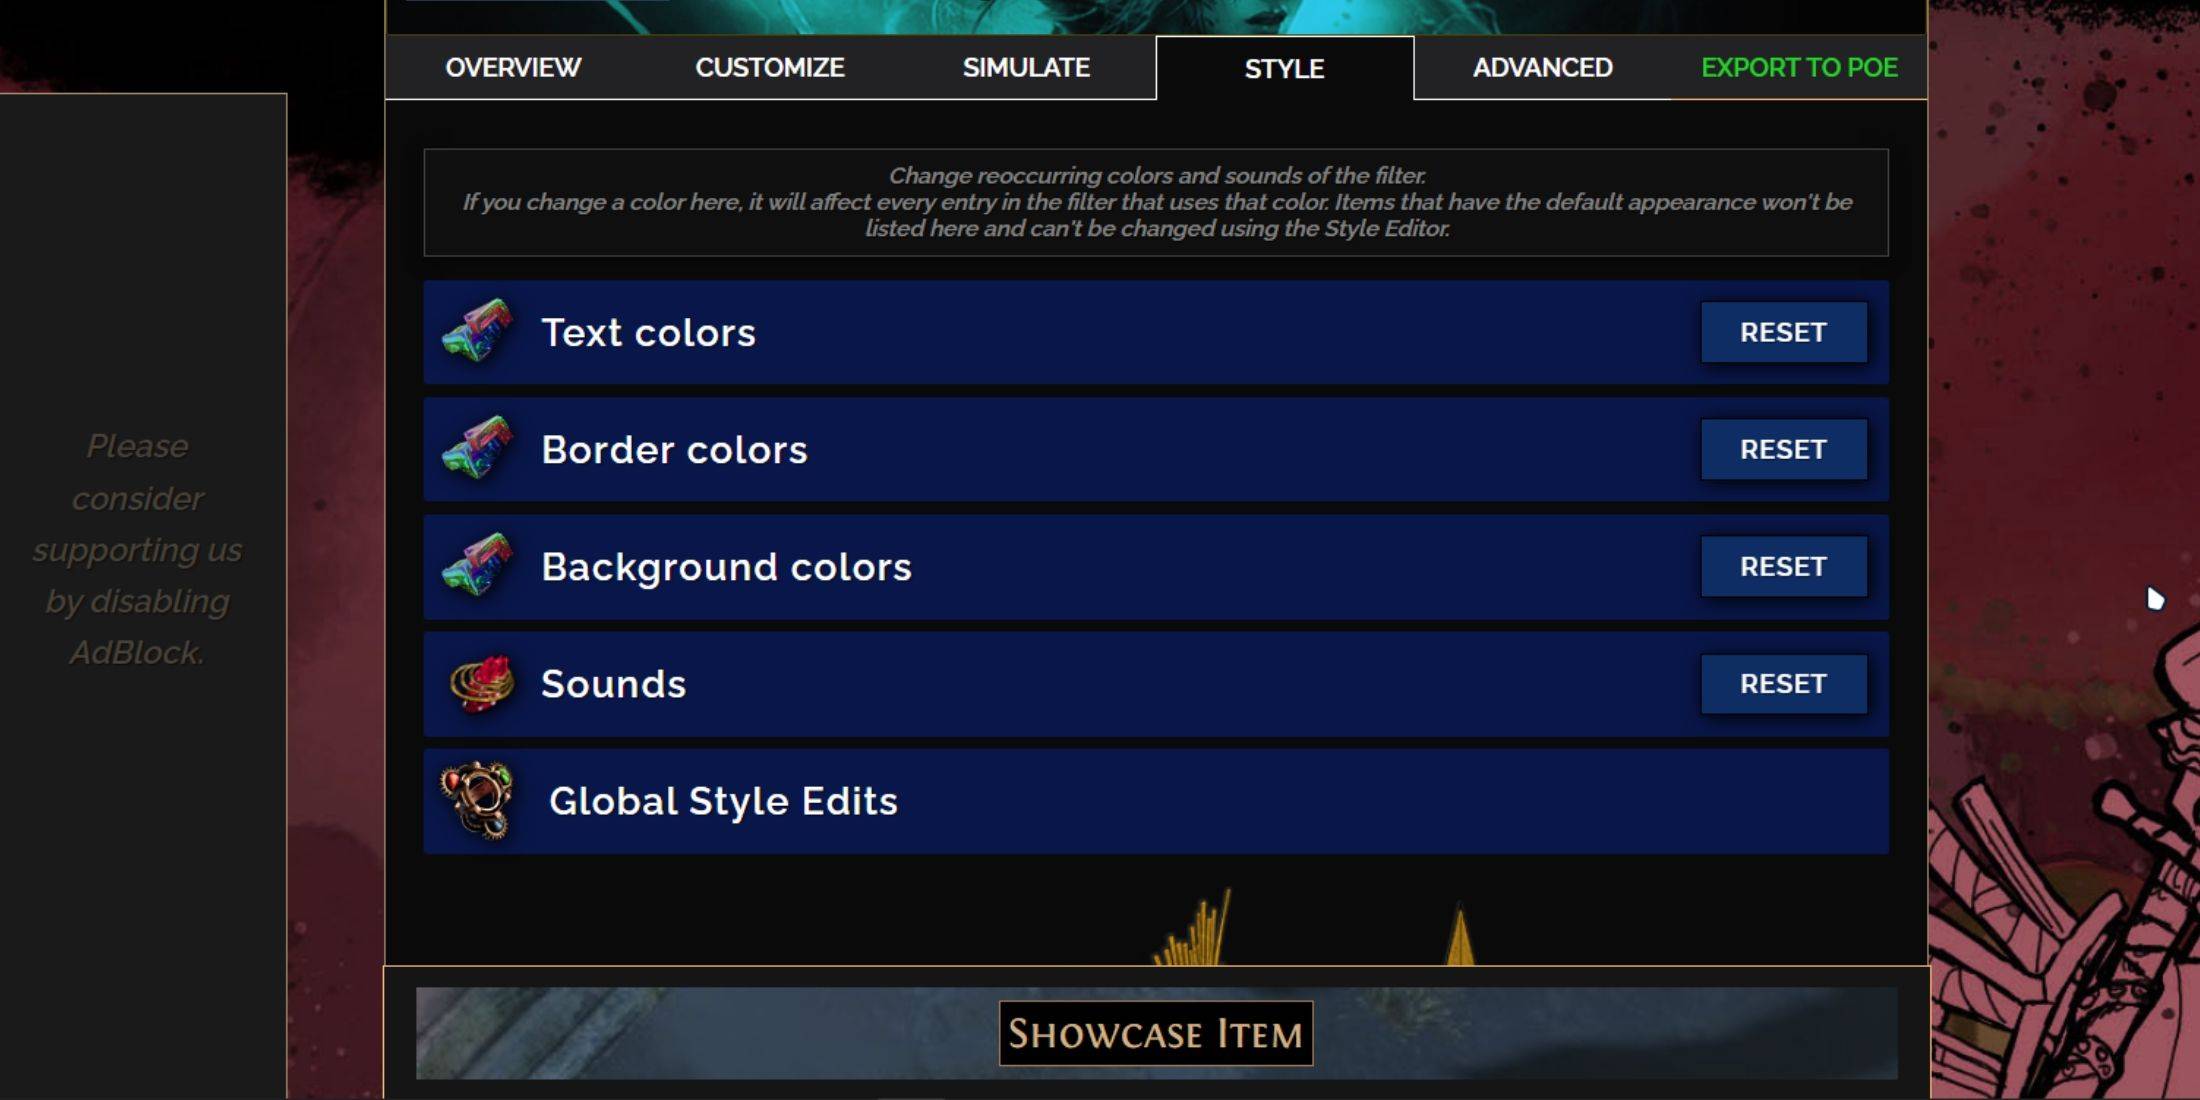
For individual item adjustments or small groups, use the 'Customize' tab. For broader, filter-wide changes, visit the 'Styles' tab. Here, you can alter the Text, Border, and Background appearance of dropped items, as well as the audio cues for valuable drops.
Changing colors is straightforward with immediate visual feedback on how items will appear in-game. For specific item adjustments, revisit the 'Customize' tab.
For sound effects, use the dropdown menu. You can upload custom .mp3 files by selecting 'Custom' or explore community sounds under 'Game & Community Sounds'. Feel free to experiment, knowing you can always revert to the original settings by selecting 'Reset'.
For those new to loot filter customization, experimenting with public Modules can be a great way to start. These are community-created presets that offer unique visual or auditory modifications to enhance your gameplay experience.